|
PREPARATION OF IMAGES FOR DIGITAL PROJECTION USING PHOTOSHOP
You can either follow the notes given below or you can click on this link to go to a slide-show of the steps that you need to take to in order to prepare your digital files for competitions.
Preparation
of Digital Images for Projection
This note gives guidance on the preparation of digital images for the
"Projected Images" category of the club Internal Competitions. The advice given below will also be useful for other club activities
and for External Competitions although some details may vary. It is important to follow the advice given here. It might be
thought that the club could be more flexible in its requirements but remember that the images will be sent to a judge and
we have no control over the way the judge will view them. Please ask for help if any aspect of this note is unclear. The instructions
below assume the use of Photoshop for image editing.
Projector. Digital images are projected using a Canon XEED SX50 projector,
which is connected to a laptop computer running Windows 7. The projector is profiled (or calibrated) periodically, using a
Colormunki Photo, to ensure accurate colour representation. To benefit from this, images should ideally be prepared on a computer
with a profiled monitor screen.
Image Format. The projector has a resolution of 1400 x 1050
pixels, giving a width-to-height ratio (or "aspect ratio") of 4:3. Any image of this aspect ratio will completely fill the
screen. Any format may be used however - there is no need to crop the image to this ratio, although you can if you wish. Some
digital cameras have a 4:3 format but many do not, and neither do film cameras. If the format is not 4:3, the projector fills
the unused screen area with black. In particular, portrait (upright) format images will be projected with a large black area
on either side.
Image adjustment. It will usually be necessary to re-size images
to suit the projector. However, any other adjustments needed (except sharpening) should be carried out first. When the image
is satisfactory visually, carry out the following checks and correct if necessary:
·
Make sure that images are in either RGB mode with 8 bits per channel, or 8 bit Grayscale mode. 16 bit
images are not acceptable.
·
Images must not contain layers; any image with layers should be "flattened" to combine the layers into
a single background layer. Layered images are not acceptable.
·
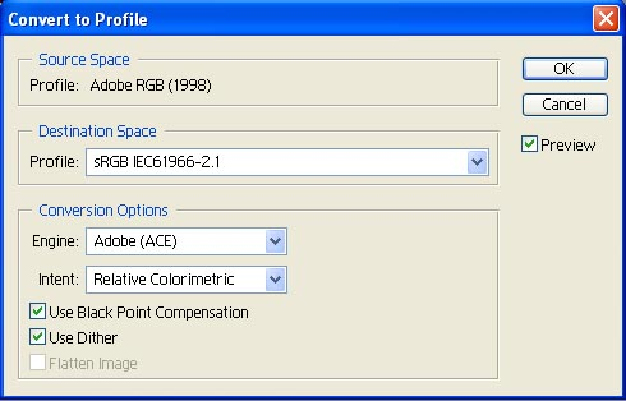
Check that the colour space (which may be called colour profile) is "sRGB", otherwise colours may not
be correct when the image is projected. If it is a different profile, then convert it to sRGB. To do this in Photoshop
7, select "Image > Mode > Convert to Profile..."; in later versions of Photoshop, the command is "Edit > Convert
to Profile...". This will open the dialog box below. Select sRGB as the Destination Space. This example shows conversion from
Adobe RGB (1998) (the Source Space) to sRGB. There should be no change in the appearance of the colours in Photoshop.
In the unlikely event that the image has no profile at all, a profile must be assigned to it using
the command "Image > Mode > Assign Profile..." in Photoshop 7 or "Edit > Assign Profile..." in later versions. This
produces the second dialog box below and shows an sRGB profile being assigned to the image.
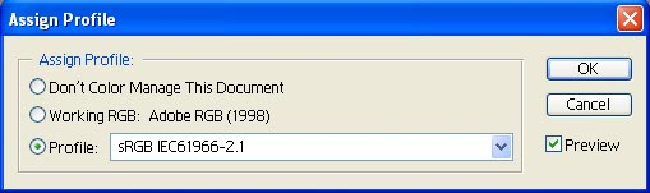
Use the Preview facility to check that the colours do not change before clicking OK. If the Preview shows that the
colours do change, try assigning a different profile starting with Adobe RGB (1998). If the colours do not change this time,
complete the assignment of this profile by clicking OK, and then convert to sRGB as above. See later in this article for the equivalent instructions if you are using
Lightroom. · If
you plan to carry out any sharpening, do not do it yet. Image
Size. Images should be re-sized to give the best fit to the projector. This means that: · EITHER the image width should be 1400 pixels (landscape format, aspect more than 4:3) · OR the height should be 1050 pixels (portrait format or landscape format with aspect less than 4:3) · If the aspect ratio
is exactly 4:3, the image size should be exactly 1400 x 1050 pixels. If the image is larger or smaller than the ideal size, it will be automatically adjusted by the viewing software to
fit the projector. The consequences are: if the image is too small, it will be enlarged, with some loss of sharpness; if the
image is larger than ideal, it will be reduced, but you have no control over how this is done, the file size will be bigger
than it needs to be and it may take longer to load.
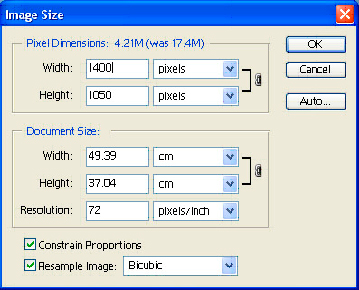
To adjust the image size in Photoshop, first make a duplicate
of the image or save it under a different name to avoid overwriting the original. Next, select Image > Image Size... from
the menu. This opens the dialog box shown on the left as it would appear for a 4:3 image of ideal size. Initially, the width
and height will be different from those shown. Make sure that "Resample Image" and "Constrain Proportions" are ticked, and
that "Bicubic" is selected as the resampling method. Also make sure that the units are pixels in the upper part of the dialog
box. For a landscape format image, set the width to 1400 pixels. The height changes automatically. If the resulting height
is more than 1050, set it to exactly 1050. The width will decrease. For portrait format, set the height to 1050 pixels. Do
not try to set both width and height as they are linked. Ignore the "Document Size" section as this is irrelevant for projection.
Click OK. Save, making sure that you do not overwrite your original. At this stage, file format should be PSD or TIF. See
later in this article for the equivalent instructions if you are using Lightroom. Sharpening. If
you wish to sharpen the image, this is likely to be more effective if done after the image has been set to the final size.
Take care not to over sharpen as this can give an unpleasant appearance. Saving. After all adjustments have been made, save the final version and do not make any
more changes to it. Although any of the usual image file formats could in principle be accepted, (eg, TIF, PSD, JPG), only
JPG format with a high quality setting should be used, to ensure maximum compatibility with a variety of software, with other
clubs and with other competitions. When saving in Photoshop, make sure that the colour profile is included in the file by
ticking the "ICC Profile" box in the "Save As..." dialog box. File
naming. It
is assumed that members know how to name and/or re-name their files, but if in doubt, ask. The standard naming convention
for internal competitions is: 3-digit membership number, underscore, Title, extension (.JPG or .jpg) Examples: CORRECT: 001_Frosty morning.jpg 020_Frosty morning.jpg 079_Frosty morning.JPG 079_Frosty_morning.jpg WRONG: 9_Frosty
morning.JPG - (single digit membership number) 79_Frosty morning.JPG - (two
digit membership number) 079Frosty morning.JPG - (no underscore character) 079 Frosty morning.JPG - (space instead of underscore character) 079_Frosty
morning.tif - (wrong file format) 079_Frosty morning.psd - (wrong file
format) 079_Frosty morning - (no extension) Frosty morning_079.JPG - (does not start with membership number) Member
079_Frosty morning.JPG (does not start with membership number) Mem no 079_Frosty morning.JPG (does not start with membership number) 079.Frosty morning.JPG (dot
instead of underscore character) 079 - Frosty morning.JPG (spaces
and dash instead of underscore) File naming for external competitions is different from the above. Specific advice will be given for each competition. Media. Image
files should be supplied to the event organisers on a CD containing only the competition entries and no other files.
If a CD contains more files than are required for the competition, the organisers may select randomly from them. In certain
circumstances, e-mail or USB flash drive (memory stick) may be acceptable, but check first. Whatever you use, make sure that
your name is on it. Submission. For competitions, the submission date for entries will be announced. For other
activities such as informal showing of members' images, please bring them one week in advance if possible. Alaistair Ramsay, Revised Nov 2010.
|